Ansistrano를 사용한 Ansible 배포
이 문서에서는 Ansible 역할 Ansistrano로 애플리케이션을 배포하는 방법을 배웁니다.
목적: 이 문서에서는 다음을 수행하는 방법에 대해 알아볼 것 입니다:
 Ansistrano 구현;
Ansistrano 구성;
배포된 버전 간에 공유 폴더 및 파일 사용;
git에서 다른 버전의 사이트 배포;
배포 단계 간의 반응합니다.
 ansible, ansistrano, 역할, 배포
지식: 
복잡성:
소요 시간: 40분
Ansistrano는 PHP, Python 등의 애플리케이션을 쉽게 배포하기 위한 Ansible 역할입니다. Capistrano의 기능을 기반으로 합니다.
소개
Ansistrano를 실행하기 위해서는 다음이 필요합니다:
- 배포 머신에서 Ansible,
- 클라이언트 머신의
rsync또는git.
rsync, git, scp, http, S3에서 소스 코드를 다운로드할 수 있습니다. , ...
참고
배포 예제를 위해 git 프로토콜을 사용하겠습니다.
Ansistrano는 다음 5단계에 따라 애플리케이션을 배포합니다.
- 설정: 리스를 호스팅하기 위한 디렉토리 구조 생성
- 업데이트 코드: 새 릴리스를 대상 서버로 다운로드
- Symlink Shared 및 Symlink: 새 릴리스를 배포한 후
현재심볼릭 링크를 이 새 릴리스로 변경 - 정리: 정리 작업 수행 (이전 버전 제거 등)
Ansistrano를 사용한 배포의 골격은 다음과 같습니다.
/var/www/site/
├── current -> ./releases/20210718100000Z
├── releases
│   └── 20210718100000Z
│       ├── css -> ../../shared/css/
│       ├── img -> ../../shared/img/
│       └── REVISION
├── repo
└── shared
    ├── css/
    └── img/
Ansistrano의 모든 문서는 Github 저장소에서 찾을 수 있습니다.
Labs
2개의 서버에서 작업을 계속 진행합니다:
관리(management) 서버
- Ansible이 이미 설치되어 있습니다.
ansistrano.deploy역할을 설치해야 합니다.
관리 되는(managed) 서버
- Apache를 설치하고 클라이언트 사이트를 배포해야 합니다.
웹 서버 배포
효율성을 높이기 위해 geerlingguy.apache 역할을 사용하여 서버를 구성하겠습니다:
$ ansible-galaxy role install geerlingguy.apache
Starting galaxy role install process
- downloading role 'apache', owned by geerlingguy
- downloading role from https://github.com/geerlingguy/ansible-role-apache/archive/3.1.4.tar.gz
- extracting geerlingguy.apache to /home/ansible/.ansible/roles/geerlingguy.apache
- geerlingguy.apache (3.1.4) was installed successfully
배포할 때 일부 방화벽 규칙을 열어야 할 수도 있으므로, ansible.posix 컬렉션을 설치하여 firewalld 모듈을 사용할 준비를 하겠습니다:
$ ansible-galaxy collection install ansible.posix
Starting galaxy collection install process
Process install dependency map
Starting collection install process
Downloading https://galaxy.ansible.com/download/ansible-posix-1.2.0.tar.gz to /home/ansible/.ansible/tmp/ansible-local-519039bp65pwn/tmpsvuj1fw5/ansible-posix-1.2.0-bhjbfdpw
Installing 'ansible.posix:1.2.0' to '/home/ansible/.ansible/collections/ansible_collections/ansible/posix'
ansible.posix:1.2.0 was installed successfully
역할과 컬렉션이 설치되면 다음과 같은 플레이북의 첫 번째 부분을 만들 수 있습니다.
- Apache설치,
vhost에 대한 대상 폴더를 생성,- 기본
vhost생성, - 방화벽을 열기,
- Apache를 시작 또는 재시작
기술적 고려 사항:
- 사이트를
/var/www/site/폴더에 배포합니다. - 나중에 살펴보겠지만
ansistrano는 현재 릴리스 폴더에 대한current심볼릭 링크를 생성합니다. - 배포할 소스 코드에는 vhost가 가리킬
html폴더가 포함되어 있습니다. 해당 폴더의DirectoryIndex는index.htm입니다. - 배포는
git을 통해 이루어지며, 패키지가 설치될 것입니다.
참고
따라서 vhost의 대상은 /var/www/site/current/html입니다.
서버 구성을 위한 플레이북: playbook-config-server.yml
---
- hosts: ansible_clients
  become: yes
  become_user: root
  vars:
    dest: "/var/www/site/"
    apache_global_vhost_settings: |
      DirectoryIndex index.php index.htm
    apache_vhosts:
      - servername: "website"
        documentroot: "{{ dest }}current/html"

  tasks:

    - name: create directory for website
      file:
        path: /var/www/site/
        state: directory
        mode: 0755

    - name: install git
      package:
        name: git
        state: latest

    - name: permit traffic in default zone for http service
      ansible.posix.firewalld:
        service: http
        permanent: yes
        state: enabled
        immediate: yes

  roles:
    - { role: geerlingguy.apache }
플레이북을 서버에 적용할 수 있습니다.
$ ansible-playbook playbook-config-server.yml
다음 작업의 실행에 유의하십시오.
TASK [geerlingguy.apache : Ensure Apache is installed on RHEL.] ****************
TASK [geerlingguy.apache : Configure Apache.] **********************************
TASK [geerlingguy.apache : Add apache vhosts configuration.] *******************
TASK [geerlingguy.apache : Ensure Apache has selected state and enabled on boot.] ***
TASK [permit traffic in default zone for http service] *************************
RUNNING HANDLER [geerlingguy.apache : restart apache] **************************
geerlingguy.apache 역할을 사용하면 Apache의 설치 및 구성 작업을 쉽게 처리할 수 있습니다.
curl을 사용하여 모든 것이 제대로 작동하는지 확인할 수 있습니다.
$ curl -I http://192.168.1.11
HTTP/1.1 404 Not Found
Date: Mon, 05 Jul 2021 23:30:02 GMT
Server: Apache/2.4.37 (rocky) OpenSSL/1.1.1g
Content-Type: text/html; charset=iso-8859-1
참고
아직 코드를 배포하지 않았으므로 curl이 404 HTTP 코드를 반환하는 것이 정상입니다. 그러나 우리는 이미 httpd 서비스가 작동하고 있고 방화벽이 열려 있음을 확인할 수 있습니다.
소프트웨어 배포
이제 서버가 구성되었으므로 애플리케이션을 배포할 수 있습니다.
이를 위해 애플리케이션 배포 전용 두 번째 플레이북에서 ansistrano.deploy 역할을 사용합니다(가독성 향상을 위해여).
$ ansible-galaxy role install ansistrano.deploy
Starting galaxy role install process
- downloading role 'deploy', owned by ansistrano
- downloading role from https://github.com/ansistrano/deploy/archive/3.10.0.tar.gz
- extracting ansistrano.deploy to /home/ansible/.ansible/roles/ansistrano.deploy
- ansistrano.deploy (3.10.0) was installed successfully
소프트웨어 소스는 github 저장소에서 찾을 수 있습니다.
배포를 관리하기 위해 플레이북 playbook-deploy.yml을 생성합니다.
---
- hosts: ansible_clients
  become: yes
  become_user: root
  vars:
    dest: "/var/www/site/"
    ansistrano_deploy_via: "git"
    ansistrano_git_repo: https://github.com/alemorvan/demo-ansible.git
    ansistrano_deploy_to: "{{ dest }}"

  roles:
     - { role: ansistrano.deploy }
$ ansible-playbook playbook-deploy.yml

PLAY [ansible_clients] *********************************************************

TASK [ansistrano.deploy : ANSISTRANO | Ensure deployment base path exists] *****
TASK [ansistrano.deploy : ANSISTRANO | Ensure releases folder exists]
TASK [ansistrano.deploy : ANSISTRANO | Ensure shared elements folder exists]
TASK [ansistrano.deploy : ANSISTRANO | Ensure shared paths exists]
TASK [ansistrano.deploy : ANSISTRANO | Ensure basedir shared files exists]
TASK [ansistrano.deploy : ANSISTRANO | Get release version] ********************
TASK [ansistrano.deploy : ANSISTRANO | Get release path]
TASK [ansistrano.deploy : ANSISTRANO | GIT | Register ansistrano_git_result variable]
TASK [ansistrano.deploy : ANSISTRANO | GIT | Set git_real_repo_tree]
TASK [ansistrano.deploy : ANSISTRANO | GIT | Create release folder]
TASK [ansistrano.deploy : ANSISTRANO | GIT | Sync repo subtree[""] to release path]
TASK [ansistrano.deploy : ANSISTRANO | Copy git released version into REVISION file]
TASK [ansistrano.deploy : ANSISTRANO | Ensure shared paths targets are absent]
TASK [ansistrano.deploy : ANSISTRANO | Create softlinks for shared paths and files]
TASK [ansistrano.deploy : ANSISTRANO | Ensure .rsync-filter is absent]
TASK [ansistrano.deploy : ANSISTRANO | Setup .rsync-filter with shared-folders]
TASK [ansistrano.deploy : ANSISTRANO | Get current folder]
TASK [ansistrano.deploy : ANSISTRANO | Remove current folder if it's a directory]
TASK [ansistrano.deploy : ANSISTRANO | Change softlink to new release]
TASK [ansistrano.deploy : ANSISTRANO | Clean up releases]

PLAY RECAP ********************************************************************************************************************************************************************************************************
192.168.1.11               : ok=25   changed=8    unreachable=0    failed=0    skipped=14   rescued=0    ignored=0
단 11줄의 코드로 많은 작업을 수행되었습니다!
$ curl http://192.168.1.11
<html>
<head>
<title>Demo Ansible</title>
</head>
<body>
<h1>Version Master</h1>
</body>
<html>
서버에서 확인 하기
이제 클라이언트 머신에 ssh로 연결할 수 있습니다.
/var/www/site/디렉토리에tree를 생성하세요.
$ tree /var/www/site/
/var/www/site
├── current -> ./releases/20210722155312Z
├── releases
│   └── 20210722155312Z
│       ├── REVISION
│       └── html
│           └── index.htm
├── repo
│   └── html
│       └── index.htm
└── shared
참고 사항:
current심볼릭 링크는./releases/20210722155312Z를 가리킵니다.shared디렉토리가 있는 것을 확인할 수 있습니다.-
./repo/에 git 저장소가 있는 것을 확인할 수 있습니다. -
Ansible 서버에서 배포를 3번 재시작한 후, 클라이언트에서 확인하세요.
$ tree /var/www/site/
var/www/site
├── current -> ./releases/20210722160048Z
├── releases
│   ├── 20210722155312Z
│   │   ├── REVISION
│   │   └── html
│   │       └── index.htm
│   ├── 20210722160032Z
│   │   ├── REVISION
│   │   └── html
│   │       └── index.htm
│   ├── 20210722160040Z
│   │   ├── REVISION
│   │   └── html
│   │       └── index.htm
│   └── 20210722160048Z
│       ├── REVISION
│       └── html
│           └── index.htm
├── repo
│   └── html
│       └── index.htm
└── shared
참고 사항:
ansistrano는 최근 4개의 릴리스를 유지합니다.current링크가 가장 최신 릴리스를 가리킵니다.
릴리스 수 제한
ansistrano_keep_releases 변수는 유지할 릴리스 수를 지정하는 데 사용됩니다.
ansistrano_keep_releases변수를 사용하여 프로젝트의 릴리스를 3개만 유지하세요. 확인하세요.
---
- hosts: ansible_clients
  become: yes
  become_user: root
  vars:
    dest: "/var/www/site/"
    ansistrano_deploy_via: "git"
    ansistrano_git_repo: https://github.com/alemorvan/demo-ansible.git
    ansistrano_deploy_to: "{{ dest }}"
    ansistrano_keep_releases: 3

  roles:
     - { role: ansistrano.deploy }
---
$ ansible-playbook -i hosts playbook-deploy.yml
클라이언트 머신에서 확인:
$ tree /var/www/site/
/var/www/site
├── current -> ./releases/20210722160318Z
├── releases
│   ├── 20210722160040Z
│   │   ├── REVISION
│   │   └── html
│   │       └── index.htm
│   ├── 20210722160048Z
│   │   ├── REVISION
│   │   └── html
│   │       └── index.htm
│   └── 20210722160318Z
│       ├── REVISION
│       └── html
│           └── index.htm
├── repo
│   └── html
│       └── index.htm
└── shared
shared_paths 및 shared_files 사용
---
- hosts: ansible_clients
  become: yes
  become_user: root
  vars:
    dest: "/var/www/site/"
    ansistrano_deploy_via: "git"
    ansistrano_git_repo: https://github.com/alemorvan/demo-ansible.git
    ansistrano_deploy_to: "{{ dest }}"
    ansistrano_keep_releases: 3
    ansistrano_shared_paths:
      - "img"
      - "css"
    ansistrano_shared_files:
      - "logs"

  roles:
     - { role: ansistrano.deploy }
클라이언트 머신에서 share 디렉토리에 logs 파일을 생성하세요.
sudo touch /var/www/site/shared/logs
그런 다음 플레이북을 실행하세요.
TASK [ansistrano.deploy : ANSISTRANO | Ensure shared paths targets are absent] *******************************************************
ok: [192.168.10.11] => (item=img)
ok: [192.168.10.11] => (item=css)
ok: [192.168.10.11] => (item=logs/log)

TASK [ansistrano.deploy : ANSISTRANO | Create softlinks for shared paths and files] **************************************************
changed: [192.168.10.11] => (item=img)
changed: [192.168.10.11] => (item=css)
changed: [192.168.10.11] => (item=logs)
클라이언트 머신에서 확인하세요.
$  tree -F /var/www/site/
/var/www/site/
├── current -> ./releases/20210722160631Z/
├── releases/
│   ├── 20210722160048Z/
│   │   ├── REVISION
│   │   └── html/
│   │       └── index.htm
│   ├── 20210722160318Z/
│   │   ├── REVISION
│   │   └── html/
│   │       └── index.htm
│   └── 20210722160631Z/
│       ├── REVISION
│       ├── css -> ../../shared/css/
│       ├── html/
│       │   └── index.htm
│       ├── img -> ../../shared/img/
│       └── logs -> ../../shared/logs
├── repo/
│   └── html/
│       └── index.htm
└── shared/
    ├── css/
    ├── img/
    └── logs
마지막 릴리스에는 css, img 및 logs의 3개 링크가 포함되어 있습니다.
/var/www/site/releases/css에서../../shared/css/디렉토리로 링크됩니다./var/www/site/releases/img에서../../shared/img/디렉토리로 링크됩니다./var/www/site/releases/logs에서../../shared/logs파일로 링크됩니다.
따라서 이 두 폴더에 포함된 파일과 logs 파일에 있는 파일은 항상 다음 경로를 통해 액세스할 수 있습니다.
/var/www/site/current/css/,/var/www/site/current/img/,/var/www/site/current/logs,
무엇보다 이들은 릴리스 간에 보존될 것입니다.
배포를 위해 리포지토리의 하위 디렉터리 사용
저장소에는 사이트 파일이 포함된 html 폴더가 있는 경우가 있습니다.
- 이 추가 수준의 디렉토리를 피하기 위해
ansistrano_git_repo_tree변수를 사용하여 사용할 하위 디렉토리의 경로를 지정할 수 있습니다.
이 변경 사항을 반영하기 위해 Apache 구성을 수정하는 것을 잊지 마세요!
서버 구성을 위한 playbook-config-server.yml에 대한 플레이북 변경
---
- hosts: ansible_clients
  become: yes
  become_user: root
  vars:
    dest: "/var/www/site/"
    apache_global_vhost_settings: |
      DirectoryIndex index.php index.htm
    apache_vhosts:
      - servername: "website"
        documentroot: "{{ dest }}current/" # <1>

  tasks:

    - name: create directory for website
      file:
        path: /var/www/site/
        state: directory
        mode: 0755

    - name: install git
      package:
        name: git
        state: latest

  roles:
    - { role: geerlingguy.apache }
<1> 해당 줄을 수정하세요.
배포를 위한 playbook-deploy.yml에 대한 플레이북 변경
---
- hosts: ansible_clients
  become: yes
  become_user: root
  vars:
    dest: "/var/www/site/"
    ansistrano_deploy_via: "git"
    ansistrano_git_repo: https://github.com/alemorvan/demo-ansible.git
    ansistrano_deploy_to: "{{ dest }}"
    ansistrano_keep_releases: 3
    ansistrano_shared_paths:
      - "img"
      - "css"
    ansistrano_shared_files:
      - "log"
    ansistrano_git_repo_tree: 'html' # <1>

  roles:
     - { role: ansistrano.deploy }
<1> 해당 줄을 수정하세요.
-
두 플레이북을 모두 실행하는 것을 잊지 마십시오.
-
클라이언트 머신에서 확인하세요.
$  tree -F /var/www/site/
/var/www/site/
├── current -> ./releases/20210722161542Z/
├── releases/
│   ├── 20210722160318Z/
│   │   ├── REVISION
│   │   └── html/
│   │       └── index.htm
│   ├── 20210722160631Z/
│   │   ├── REVISION
│   │   ├── css -> ../../shared/css/
│   │   ├── html/
│   │   │   └── index.htm
│   │   ├── img -> ../../shared/img/
│   │   └── logs -> ../../shared/logs
│   └── 20210722161542Z/
│       ├── REVISION
│       ├── css -> ../../shared/css/
│       ├── img -> ../../shared/img/
│       ├── index.htm
│       └── logs -> ../../shared/logs
├── repo/
│   └── html/
│       └── index.htm
└── shared/
    ├── css/
    ├── img/
    └── logs
<1> html이 없다는 점에 유의하십시오.
git 브랜치 또는 태그 관리
branch 또는 tag를 배포하기 위해 ansistrano git_branch 변수를 사용합니다.
releases/v1.1.0브랜치를 배포하세요.
---
- hosts: ansible_clients
  become: yes
  become_user: root
  vars:
    dest: "/var/www/site/"
    ansistrano_deploy_via: "git"
    ansistrano_git_repo: https://github.com/alemorvan/demo-ansible.git
    ansistrano_deploy_to: "{{ dest }}"
    ansistrano_keep_releases: 3
    ansistrano_shared_paths:
      - "img"
      - "css"
    ansistrano_shared_files:
      - "log"
    ansistrano_git_repo_tree: 'html'
    ansistrano_git_branch: 'releases/v1.1.0'

  roles:
     - { role: ansistrano.deploy }
참고
배포 중에 브라우저를 새로 고침하여 변경 사항을 실시간으로 확인할 수 있습니다.
$ curl http://192.168.1.11
<html>
<head>
<title>Demo Ansible</title>
</head>
<body>
<h1>Version 1.0.1</h1>
</body>
<html>
v2.0.0태그를 배포합니다.
---
- hosts: ansible_clients
  become: yes
  become_user: root
  vars:
    dest: "/var/www/site/"
    ansistrano_deploy_via: "git"
    ansistrano_git_repo: https://github.com/alemorvan/demo-ansible.git
    ansistrano_deploy_to: "{{ dest }}"
    ansistrano_keep_releases: 3
    ansistrano_shared_paths:
      - "img"
      - "css"
    ansistrano_shared_files:
      - "log"
    ansistrano_git_repo_tree: 'html'
    ansistrano_git_branch: 'v2.0.0'

  roles:
     - { role: ansistrano.deploy }
$ curl http://192.168.1.11
<html>
<head>
<title>Demo Ansible</title>
</head>
<body>
<h1>Version 2.0.0</h1>
</body>
<html>
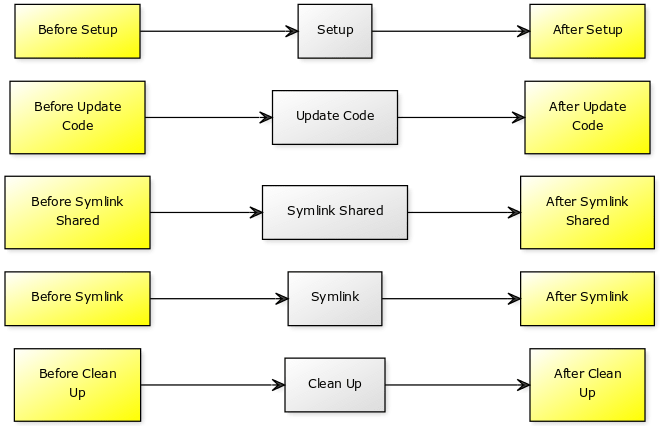
배포 단계 간 작업
Ansistrano를 사용한 배포는 다음 단계를 준수합니다:
설정코드 업데이트심볼릭 링크 공유심볼릭 링크정리
각 단계 이전과 이후에 개입할 수 있습니다.
이를 위해 다음과 같은 변수를 통해 playbook을 포함시킬 수 있습니다:
ansistrano_before_<task>_tasks_file-
또는
ansistrano_after_<task>_tasks_file -
쉬운 예: 배포 시작 시 메일 전송(또는 Slack 알림 등):
---
- hosts: ansible_clients
  become: yes
  become_user: root
  vars:
    dest: "/var/www/site/"
    ansistrano_deploy_via: "git"
    ansistrano_git_repo: https://github.com/alemorvan/demo-ansible.git
    ansistrano_deploy_to: "{{ dest }}"
    ansistrano_keep_releases: 3
    ansistrano_shared_paths:
      - "img"
      - "css"
    ansistrano_shared_files:
      - "logs"
    ansistrano_git_repo_tree: 'html'
    ansistrano_git_branch: 'v2.0.0'
    ansistrano_before_setup_tasks_file: "{{ playbook_dir }}/deploy/before-setup-tasks.yml"

  roles:
     - { role: ansistrano.deploy }
deploy/before-setup-tasks.yml 파일을 생성합니다.
---
- name: Send a mail
  mail:
    subject: Starting deployment on {{ ansible_hostname }}.
  delegate_to: localhost
TASK [ansistrano.deploy : include] *************************************************************************************
included: /home/ansible/deploy/before-setup-tasks.yml for 192.168.10.11

TASK [ansistrano.deploy : Send a mail] *************************************************************************************
ok: [192.168.10.11 -> localhost]
[root] # mailx
Heirloom Mail version 12.5 7/5/10.  Type ? for help.
"/var/spool/mail/root": 1 message 1 new
>N  1 root@localhost.local  Tue Aug 21 14:41  28/946   "Starting deployment on localhost."
- 아마도 배포가 끝난 후 일부 서비스를 재시작해야 할 것입니다. 예를 들어 캐시를 지우기 위해 Apache를 재시작해보겠습니다:
---
- hosts: ansible_clients
  become: yes
  become_user: root
  vars:
    dest: "/var/www/site/"
    ansistrano_deploy_via: "git"
    ansistrano_git_repo: https://github.com/alemorvan/demo-ansible.git
    ansistrano_deploy_to: "{{ dest }}"
    ansistrano_keep_releases: 3
    ansistrano_shared_paths:
      - "img"
      - "css"
    ansistrano_shared_files:
      - "logs"
    ansistrano_git_repo_tree: 'html'
    ansistrano_git_branch: 'v2.0.0'
    ansistrano_before_setup_tasks_file: "{{ playbook_dir }}/deploy/before-setup-tasks.yml"
    ansistrano_after_symlink_tasks_file: "{{ playbook_dir }}/deploy/after-symlink-tasks.yml"

  roles:
     - { role: ansistrano.deploy }
deploy/after-symlink-tasks.yml 파일을 생성하세요.
---
- name: restart apache
  systemd:
    name: httpd
    state: restarted
TASK [ansistrano.deploy : include] *************************************************************************************
included: /home/ansible/deploy/after-symlink-tasks.yml for 192.168.10.11

TASK [ansistrano.deploy : restart apache] **************************************************************************************
changed: [192.168.10.11]
이 장에서 보았듯이 Ansible은 시스템 관리자의 수명을 크게 향상시킬 수 있습니다. Ansistrano와 같은 매우 지능적인 역할은 빠르게 필요한 "필수 항목"입니다.
Ansistrano를 사용하면 우수한 배포 관행을 준수하고 시스템을 신속하게 운영에 올릴 수 있도록 도와주며 잠재적인 인적 오류의 위험을 줄여줍니다. 기계는 빠르고 효율적으로 작동하며 실수를 거의 하지 않습니다!